Monday, August 30, 2010

Baby Wall Letters


For my niece Megan's room my sister-in-law picked this adorable Twinkle Little Star Baby Bedding by Kimberly Grant.  This set is great it really goes with their home, they have brown and tan throughout the rest of the home so it really ties in well.  The bedding is also great because it is gender neutral.  When they have another baby later on they can reuse it.


It is a combo of tan, chocolate brown, with lime green.  As accents she picked a dark watermelon pink.  My sister in law bought most of the pieces in the set, but still wanted to customize the room and make it feel not like it all came out of a box. 
For Megan's wall art we wanted to do something personalized and custom yet fun and simple.  We decided to put her name on the wall but in a creative fun way.  Megan's Aunt Jenny came up with this creative way of putting her name on the wall. 


I didn't take pictures of the process (bad blogger I know) but I can walk you through it.  We picked up these white picture frames from Ross.  The letters came from Michaels Craft Store, you can also get the from JoAnns or Hobby Lobby.  We had to go to 5 Michaels stores to get all the letters, make sure you have all the letters before you start as some might be hard to find.
Inside of the frame we picked up two fitted baby crib sheet from Ross for $2.99.  Originally we were going to buy some sheets from her bedding set so everything would match.  The baby bedding was very expensive so we started looking for another option.  I found this brown and white pock a dot sheets at Ross.   They are from Tiddliwinks, which did a knock off of the Little Star bedding a year ago.  We picked this so the colors would match but yet it wouldn't be too busy in the background.  I also picked up sheets with lime green stars which matched perfectly but it was too busy and took away from the letters.  We want the letters to shine and the background to just blend in nicely.

We added the watermelon pink ribbon to the top of the frame to tie that color throughout the room.  We only used the pink as an accent in the room.  We then painted the letters white with left over paint from her dresser.  The letters were glued on to the glass of the frame, the frames weren't deep enough to put the letters inside.  To add another detail to the letters we then added a symbol to go with each letter.  


These were super easy to make, and took about an hour to do.  Anyone can do this!  These letters add a great personalized touch to her nursery and takes it from out of the box nursery and turns it into a really cute and custom nursery.

***Parties I'm linking to this week.***

Between Naps on the Porch
Cottage Instincts
The Girl Creative
The DIY Showoff
Super Stinky Boys
Keeping it Simple
Thrifty Treasures
Making The World Cuter
Sumo’s Sweet Stuff
Skip To My Lou
Tools are for Women too
Mad in Crafts
It’s So Very Cheri
Trendy Treehouse 
http://www.livingonloveandcents.blogspot.com/
Me Making Do 
Twice Owned Tuesday
All Thingz Related
Craft Edition
The Gypsy’s Corner
Coastal Charm
A Silly Little Sparrow
The Pumpkin Patch
Me and my Bucket
Domestically Speaking
The Trendy Treehouse
Gettin’ Crafty on Hump Day
Heart and Home
T-shirt Diaries
Someday Crafts
Blue Cricket Design
Sew Much Ado
My Backyard Eden
The Thrifty Home
Creations By Kara
House of Hepworths
Somewhat Simple
Tales from Bloggeritaville
The Shabby Chic Cottage
Beyond The Picket Fence
Seven Thirty Three – A Creative Blog
Life as Lori
Thrilling Thursdays @Paisley Passions
Chic on a Shoestring Decorating
Decor Momma
Remodelaholic
Fingerprints on the Fridge
Fun to Craft
Miss Mustard Seed
It’s a Hodge Podge Life
The Shabby Nest
Frugal and Fabulous
Kojo Designs
The Girl Creative New Friend Friday
A Few of My Favorite Things
It’s a Blog Party!
My Romantic Home
A Vision to Remember
Funky Junk Interiors
A Little Lovely Along for the Ride
Style Feature Saturday at Perfectly Imperfect

Thursday, August 26, 2010

Mirror, Mirror on the Wall

I have been dreaming of redoing our mantel for some time.  I have never really liked what was displayed on it.  The only problem is our mantel is only 5 inches deep, which doesn't give you much room. 
 
Here is a picture of what it looked like before.


I decided that I didn't like the candle sconces any more and removed them.  I also didn't like the picture frames up there any more, it really cluttered the mantel.  After I removed these items I felt the mirror was lacking something.  I bought this mirror and two others just like it for $5 about 4 years ago at Big Lots.  I really wanted a new mirror but with our big move coming up I knew a new mirror wasn't in the budget.  My husband said if I could just live with the mirror for a little while longer he would buy me a new one once we move.  

I really don't like the color of the mirror, the mirror was kind of a silver color but looked more gray than silver. 


I forgot to take a picture of the before, but this is the other mirror that is almost identical.


Another picture of the other mirror to show the before.

I decided that I would paint the mirror and give it a new look.  This way I get a new mirror for a few months until I can buy something else.  I took out my Blue Sage paint from Restoration Hardware and got to work.


After two coats of paint I used Rub n' Buff silver to hi-light the detail in the piece and bring out the details.


By making over the mirror using things I had on hand I saved money and got a new look for my mantel and essentially a new mirror.


After making over my mirror, I don't know if I really want a new one (but don't tell me husband).  I really liked the way it came out.  It's amazing how a coat of paint can transform an old, tired, out dated mirror, and turn it into a brand new piece.

***Parties I am linking to this week.***
Twice Owned Tuesday
All Thingz Related
Craft Edition
The Gypsy’s Corner
Coastal Charm
A Silly Little Sparrow
The Pumpkin Patch
Between Naps on the Porch
Making The World Cuter
Cottage Instincts
The Girl Creative
Sumo’s Sweet Stuff
The DIY Showoff
Skip To My Lou
Super Stinky Boys
Keeping it Simple
Tools are for Women too
Mad in Crafts
It’s So Very Cheri
Me and my Bucket
Domestically Speaking
The Trendy Treehouse
Gettin’ Crafty on Hump Day
Heart and Home
T-shirt Diaries
Someday Crafts
Blue Cricket Design
Sew Much Ado
My Backyard Eden
The Thrifty Home
Creations By Kara
House of Hepworths
Somewhat Simple
Tales from Bloggeritaville
The Shabby Chic Cottage
Beyond The Picket Fence
Seven Thirty Three – A Creative Blog
Life as Lori
Thrilling Thursdays @Paisley Passions
Chic on a Shoestring Decorating
Decor Momma
Remodelaholic
Fingerprints on the Fridge
Fun to Craft
Miss Mustard Seed
It’s a Hodge Podge Life
The Shabby Nest
Frugal and Fabulous
Kojo Designs
The Girl Creative New Friend Friday
A Few of My Favorite Things
It’s a Blog Party!
My Romantic Home
A Vision to Remember
Funky Junk Interiors
A Little Lovely Along for the Ride
Style Feature Saturday at Perfectly Imperfect

Tuesday, August 24, 2010

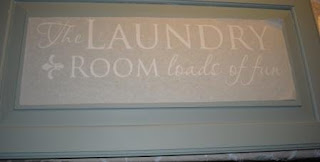
From Kitchen Cabinet to Laundry Room Sign

A few weeks back I picked up this great kitchen cabinet door for $2 at our local Habitat for Humanity Restore. 


My plan was to make it into a sign for my laundry room.  Vinyl letters and sayings are all the rage right now and I love them.  The only problem is my husband's job as a contractor for the government we will probably move a few times over the next few years and I didn't want to have to buy a new saying every time.  My friend suggested that I frame my favorite saying.  I liked that suggestion but wanted to do something different and cheaper.  This is were the cabinet doors at the Restore came in handy.

I sanded down the piece and filled in a few dents with wood putty.  It was all ready to prime.


I had some left over white primer from a previous project.  The next decision was what color to paint it.  Again I went to my favorite store Restoration Hardware. I love the Silver Sage Collection, I have used Silver Sage and Blue Sage from the line.  My local store was under going a remodel and was low on sample sizes.  They didn't have Silver Sage in stock, so I went the next color up to Sea Green.


On a side note their sample sizes go a long way, I had enough to do this door and about 2-3 more.  They are a great price at $3.95 each.  After two coats of Sea Green (my new favorite color, I'm surprised I never picked it up before), I was ready for my vinyl lettering.  I search on the internet for vinyl letters with a laundry theme.  I found the best price on Esty.com, if you haven't shopped there before check it out.  They have more than just handmade crafts.


I picked up this vinyl saying for $9.95 from Jazzy Graphics.  They have some great prices and sizes of graphics.  Remember to check the size of the graphic you are ordering.  I double checked to make sure it would fit.


The color is a little off in this photo, not sure why.

I used a kitchen spatula to smooth the letters on to the cabinet door, no need to buy a fancy tool.
I think it turned out pretty good.  The total cost was around $18 plus I have paint left over for my next project.  The next time you are in a Habitat for Humanity Restore look around and see what items can be used in a new way and re-purposed.


I really wanted to hang it up but with us moving in 4 weeks I decided to just lien it up against the wall.  Once we move I will hang it up.


This project was featured at Olivia Renn and Creations by Kara this week.  Pop over and see what other great projects are also featured.

***Parties that I am linking this DYI project to.***
New Nostalgia Twice Owned Tuesday
Coastal Charm
A Silly Little Sparrow
I’m Topsy Turvy
The Pumpkin Patch
Today’s Creative Blog
All Thingz Related
Craft Edition
Tales from Bloggeritaville
The Shabby Chic Cottage
Beyond The Picket Fence
Seven Thirty Three – A Creative Blog
Life as Lori
 Decor Momma
Fingerprints on the Fridge
Fun to Craft
The Shabby Nest


Monday, August 23, 2010

Getting Ready for the Big Move Across Country Part 1

As my husband so lovingly reminded me this morning, we have 25 days until the moving truck leaves our home headed to our new home.  Yikes!  That doesn't sound like a lot of time, I think it will be just enough.

My husband also reminded me that I need to finish up all my projects and save the big projects for after our move.  I know he is right but part of me just wants to focus on my decorating projects and forget about the move.  I know I can't do this, but a girl can dream.  Since there is a lot involved with moving I thought that I would start a series dedicated to our move called Getting Ready for the Big Move Across Country.

I hope that you all will love this series.  Today is part one, dedicated to gathering up all paper work needed from our current vendors.

When moving we all think of ordering our medical records from our doctors but did you know there are more vendors that you need to contact other than your doctor?  Think of all the services you use monthly to even yearly.  What about the eye doctor, vet, hair salon, or even your dentist?

I started out making a list of all vendors that we use and that I wanted my files from and to change our address with.  Here is my list:
Doctor
Laura's Dentist
Chad's Dentist
Eye Doctor
Vet for Maggie
Vet for Stewie
Dog Microchip Company
Hair Salon
CPA/Tax Preparer
Insurance Agent


Next to each vendor I included their phone number and address, for my use now and future reference later.  Some vendors will need up to 2 weeks to copy your file, so it is best to start early. 
 
I contact each of our doctor offices to get a copy of our medical records.  Note that they usually charge you per page copied, so if there are things that you don't want copied let them know.   While contacting them I also had them give us prescriptions for all of our medications.  I also made sure that I get all of our prescriptions filled prior to our trip, our doctor ordered 90 day supplies for us. 

We also contacted our dentist to get copies of our records, especially our x-rays.  I had just had my annual x-rays taken and knew that my insurance would not authorize another set this year, so I wanted to make sure we got them.

For some reason we started Maggie at one vet then when we got our second Cocker Spaniel Stewie we found a low cost vet for all of our needs.  I never transferred over Maggie's medical record, so I had to call both vets to get their records.  I also double checked to make sure that everyone was up to date on all their shots.  It turned out that Maggie would be due for a shot just after we move, knowing that things would be crazy I had her shots done just before we left.

We had both of our dogs micro chipped with the local SPCA.  I contacted them and got copies of our chip records and up dated our address and phone numbers.  This way if the dogs get lost during our trip and are found we could be located.

Some of you may be thinking why would I want my file from my hair salon.  I really love the colors that are used in my hair and wanted to make sure that my new stylist could use the same colors.  My stylist currently uses Redken and recommended that I go to their web-site and look up stylist in VA that also use these products.  She gave me the colors that she uses, the mixing formula, and how she cuts my hair when it short.  I have really thick hair and wavy hair, it took us two cuts to figure out how to cut it so it would lay nicely.  She included tricks to cutting my hair to help out the new stylist.  

I contacted our CPA and got a copy of our last tax return, because I couldn't find it for some reason. I also let them know that we were moving out of the area so they won't spend money next year sending us the large tax preparation booklet. 

Lastly I contacted our insurance agent.  I wanted to see if we could continue our coverage to our new state and if they could recommend a new insurance agent.  They gladly recommended a new agent.  We were able to keep the same company and our rates went down a little bit.  Our insurance company even sent us a moving packet with some useful tips and tricks. 

The next part will be organizing and decluttering our home prior to the big move.


Friday, August 20, 2010

$4 Shelve

Near my home there is this great American Cancer Society Thrift Store.  They have tons of great things, and the store isn't over crowded so you can really see the items they have for sale.  Plus they have great sales from time to time.

I stopped by one afternoon last week to take a quick check to see if any new treasures had come in.  I saw this great shelve leaning against the wall.  It had great bones plus it was only $4, SOLD!!


The shelve was in great shape structurally, it was white with a crackle finish on the top exposing gold.  Gold is not really a favorite color mine and the piece had some scratches in it which I knew a new coat of paint would fix.

I pulled out my trusty Restoration Hardware Blue Sage and gave it a new coat of paint.
  
Once I finished I felt that it needed something to finish off the piece, it was looking too plain. I went to Lowes and picked up a wood applique and using a little Gorilla Glue I glued it to the front of the piece.  I applied a little silver Rub n' Buff to the wood piece to give it some dimension.


Now I have a brand new shelve for my home.   The total cost of the project was under $10.

***Parties that I have linked up to. Please stop by and look at some of the other amazing projects at each party!***

Between Naps on the Porch
Making The World Cuter
Cottage Instincts

When Life Throws You a Curve Ball

Just when I thought I was going to spend the rest of August and part of September finishing my Guest Bedroom and Office, I was thrown a curve ball.  My husband's company is transferring us from CA to Virginia!  I was so looking forward to finishing the house, and now I'm starting a new one which 
isn't all bad. ;)

The next 5 weeks are going to be crazy, I am scrambling to find a home in VA and finalizing all the moving details.  I am so fortunate that my husband medically retired from the Air Force almost a year ago and that the military will be handling moving all of our belongs, boy does that take a load off of me.   

The next two weeks before they pick up our belongs will be spent cleaning out our current home, reorganizing a few closets, and decluttering.  Good thing we just held a garage sale in our neighborhood and go rid of a lot of items.

I would love to hear from anyone who has moved across the country or a long distance, please feel free to provide me with any tips or tricks that you have learned along the way.  I have lived in Northern California my whole life and have moved only short distances before, this will be my first long distance move.  We will also be driving the 2,700 miles across country with our two Cocker Spaniels, so if you have any traveling tips please let me know.

Also, if anyone lives in Virginia or near Washington DC, please let me know of some of the great things we should do while we are living there, share some of the great places to shop and eat.  I would love to learn more about our new home, since I won't be able to do a house hunting trip before we move out there. 

I hope everyone has a great weekend!


Wednesday, August 18, 2010

Mail Sorter

Over the last few months I have been thinking of a way to help keep our mail organized and in one central place within the house.  Currently all the mail tends to end up on the kitchen counter or just about any flat surface in the house, its a mess.  

With the beginning of my office remodel, I thought now would be a great time to find a way of keeping our mail organized and off the kitchen counter.  

I have been in love with the wood wall pockets that Ballard Designs sells, but the $89 price tag has stopped me from purchasing them.  


While shopping at the thrift store last week I found this great mail sorter for $10, and it looks almost like the Ballard Design wood wall pocket.  I knew that I could turn it into a Ballard Designs knock off.  It was in great condition but the wood didn't go with the decor in my office nor look like the knock off piece, but with the great price I couldn't pass it up. 


I removed the hardware and sanded down the wood a little because it was finished with a high gloss sealer.  After a little sanding it was ready for a nice coat of white paint, just like the ones at Ballard Designs.  I picked some Sail Cloth paint from Lowes and got started. 


It was too hot to paint outside, so I had to use the kitchen table.


The piece had these great name plates.  I printed out a tag for my husband's mail, my mail, and junk mail using Edwardian Script.  First I printed the tags on regular white paper but it didn't look right against the new coat of white paint.


I decided to look through some scrape book paper that I had left.  I found a great piece that was a light teal color, I love the way it popped against the white and coordinated with the rest of my office.  I was going to spray paint the hardware silver, but my husband liked the bronze color and asked that I keep.  I may change my mind later, but for right now it looks good.  


I really like our new mail station, I think it is a pretty close copy to the wood wall pockets from Ballard Designs.  


I can't wait to finish the rest of my office.  

 I'm so honored Creating a House of Grace has listed this project as part of her Tuesday party, Twice Owned Tuesday this week!  Please stop by and look at the other amazing projects that also won the title of Twice Owned Queen this week.

***Parties I am linking to.***
http://www.tipjunkie.com/handmade-projects/
http://todayscreativeblog.blogspot.com/2010/08/get-your-craft-on-tuesdays.html
http://www.bluecricketdesign.net/
http://www.domestically-speaking.com/
http://thetrendytreehouse.blogspot.com/
http://www.thethriftyhome.com/
http://heidi-heartandhome.blogspot.com/
http://bec4-beyondthepicketfence.blogspot.com/
 http://lifeaslori.blogspot.com/
http://thetrendytreehouse.blogspot.com/

    Tuesday, August 17, 2010

    New Guest Room

    I am so excited the fabric I special ordered from JoAnns came today.  I am in the process of making an upholstered headboard, curtains, and pillows for my guest room.  

    I was really tired of the guest bedroom as it currently looks.  I had taken what used to be in my master bedroom and just put in in the guest room.   The bedding I have in this picture is from Targets Field Crest line.  I bought it over 5 years ago, and I must say it has held up very well.  I still love the colors, but I'm tired of them.  The furniture is what used to be in the master minus the sleigh bed.  When we moved into our current house the movers broke my sleigh bed.  Which turned out to be a good thing, it meant I got to buy new furniture. 


    I went to TJ Maxx and bought a new chocolate bed in a bag set from the Hotel Collection.  The bedding made the room really dark so I needed some new fabrics to lighten the room up.  I also needed to make black out curtains for this room because my husband works for the military and sleeps in this room during the day.  Since we have really high ceilings I have to make blackout curtains because our choices are really limited with store bought curtains.

    Here are the fabrics I picked to go with our chocolate bedding. 

    Waverly: Essence Mineral ~ Headboard


    Robert Allen: Free Water Capri ~ Curtains


    Richloom: Sowell Seaglass ~ Pillows


    Don't let the colors on the computer fool you.  The match in real life and the colors look really different in person.  I loved the waverly pattern and started with that, then I found a stripe and paisley fabric to match.  I am always amazed how some of the designers on HGTV can take 3 or 4 fabrics all with different patterns and make them all work well together.  I guess I have been watching too much Divine Design or Sarah's House because I decided to try it myself.   I have always been very matchy, matchy this will be a first for me on many levels.


    I can't wait to finish this room and share the final product.

    Laura